Halloween · seasonal project
Tools
Free printable jack-o’-lantern face template for a clay pumpkin
A small clay pumpkin, 8, 9 or 10 cm tall including the stem and about the same width, made from two pinch pots joined rim to rim into a hollow ball. Pick a size and a face, and the template works out how wide and deep to pinch each half and redraws the front view, a rim check circle, the lid that an LED tea light goes in through, and the face stencils at actual size.
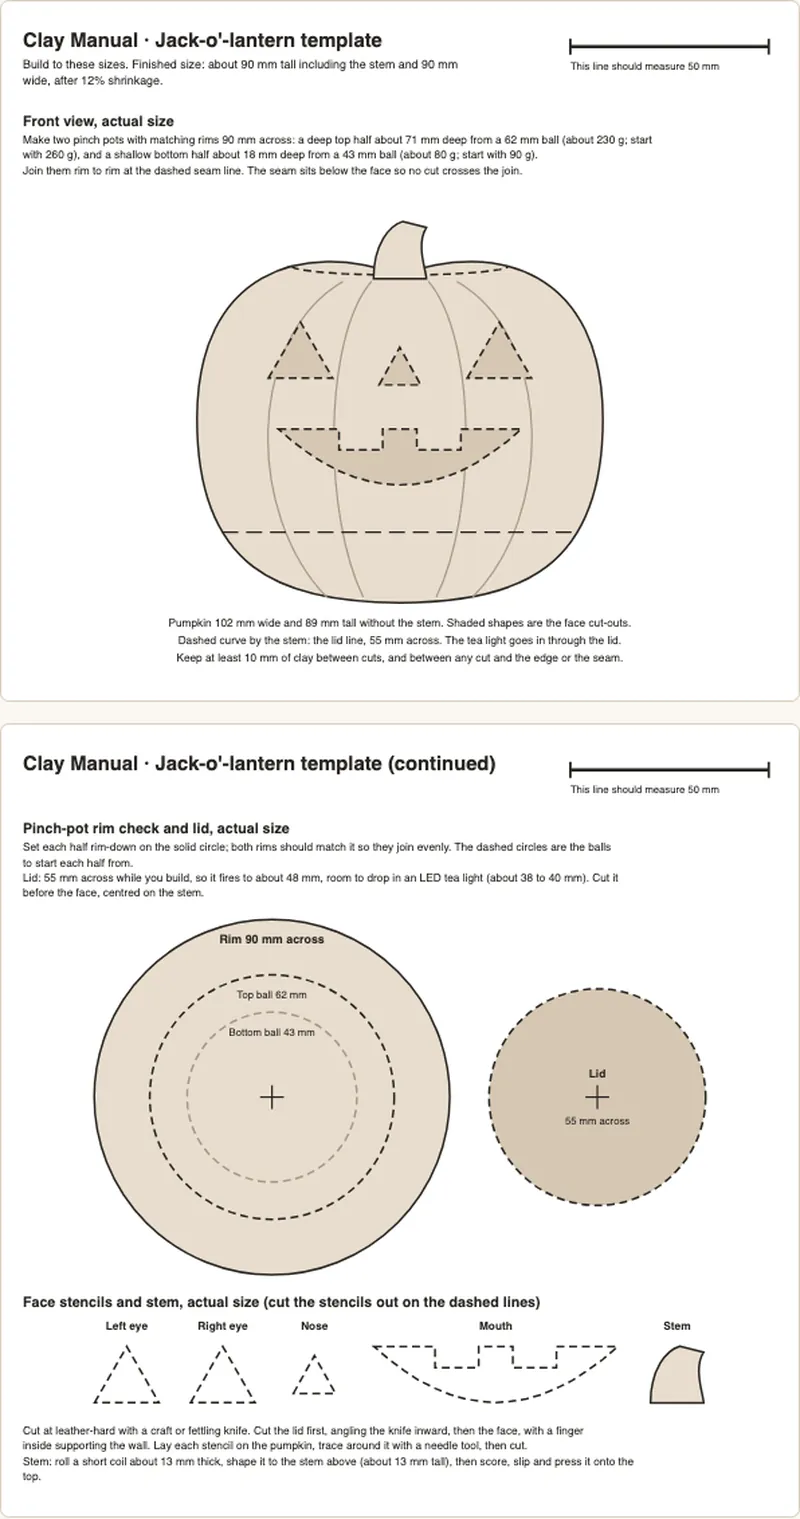
A ready-to-print PDF of the 9 cm pumpkin shown below (9 cm tall including the stem and 9 cm wide) with its standard face and 12% shrinkage, on US Letter (two pages). Print it at 100% (“actual size”). To change the face, size, or shrinkage, use the options below and print from this page instead.
Using it
- Roll two balls of clay the sizes of the dashed circles on page 2: a bigger one for the top and a smaller one for the bottom. Pinch the top ball into a deep bowl, curving the wall in a little toward the rim, and the bottom ball into a shallow bowl. Set each rim-down on the solid circle and keep pinching until both rims match it.
- Score and slip both rims, press them together into a hollow ball, and smooth the seam. The seam sits low, below the face, so no cut crosses the join. Hold the front view against it to check the size and shape.
- Press the ribs in right after joining, while the clay is still soft: shallow grooves from the top to the base. Don’t wait for leather-hard; that stage is for cutting. For the stem, roll a short coil, shape it to the stem on page 2, then score, slip and press it on top.
- When the clay is leather-hard, cut with a craft or fettling knife for clean edges. Cut the lid first: trace the full-size lid circle from page 2 around the stem (55 mm across for the standard pumpkin, so it fires to about 48 mm, room to drop in an LED tea light), and cut along it, angling the knife inward toward the middle. The lid then comes out wider at the top than at the bottom, so it sits on a ledge and can’t drop in. The stem becomes its handle.
- With the lid off, a finger through the opening can support the wall from inside while you cut the face. Lay the stencils on the pumpkin, trace around them with a needle tool, and cut the shapes through the wall, leaving at least 10 mm of clay between cuts and between any cut and the edge or the seam. The bottom stays closed; the face and the lid let air out of the hollow ball in the kiln.
- Put the lid back and let it dry in place on the pumpkin, slowly, under plastic, so the two shrink together and still fit before it is fired.
- When you glaze, keep glaze off the cut edges where the lid and the body touch, or they can fuse together in the kiln.
The full walkthrough is in our clay jack-o’-lantern project.
About this template
This is a starting point we drew, not a pattern from a book. Page 1 is the front view of the joined pumpkin, with the seam where the two halves meet, the lid line around the stem, and the face shapes showing where each cut-out lands. Page 2 has a circle the size of both rims to check your pinch pots against, the lid at full size, and each face shape on its own, ready to cut out as a paper stencil.
The face is laid out so that at every size there is at least 10 mm of clay (at building size) between any two openings, and between an opening and the edge of the pumpkin or the seam. Thin bridges crack as the clay dries and fires. To make room for that, the seam sits below the face rather than at the widest point, so the top half is the deeper bowl.
The ball sizes use the same rule as our dog and cat templates: half of a rounded shell with 6 mm walls while building, plus 10% for smoothing and joining. The weight in grams is that ball at the clay density our vessel calculator assumes (1.9 g/cm³), rounded to 10 g. For the standard pumpkin that is about 230 g for the top half and 80 g for the bottom. We suggest starting with about 10% more (260 g and 90 g), because a beginner’s walls are rarely even and it is easier to pinch off spare clay than to add it. If your halves come out thick, pinch them thinner rather than adding clay.
The lantern is decorative. If you light it, lift the lid and drop in an LED tea light. The shrinkage number the template asks for is explained in our shrinkage notes. There are also dog and cat templates.
Glaze to match
For a bright orange at a mid-range stoneware firing, Mayco’s Stoneware Gloss Orange Gloss (SW-503) is one option. Mayco lists it at cone 6, where it describes a highly pigmented bright orange gloss with opaque coverage, and at cone 10, where the color darkens. Check that it matches the cone your studio fires to.
Keep glaze off the cut edges where the lid sits on the body, so the lid doesn’t fuse in place. Glazes look different on different clays. Test it on a scrap of your own clay, fired in your studio’s kiln, before you glaze the pumpkin.